
Content
- What is a Path Scanner?
- How do I use Path Scanner?
- Ready for some examples?
- File status description
- Output description
- Set custom CSV delimiter
- Set date and time format for result files
- Add Path Scanner to system enviroment variable PATH
- Run Path Scanner with Task Scheduler
1. What is a Path Scanner?
Path Scanner is a powerful and fast file scanner (command line application), which will help you identify long file path on your computer or server. The results are saved into plain text file in CSV format and XML, which can be easily opened in any XML/CSV/spreadsheet editor or viewer. The program also supports UNC file paths.
It uses Microsoft Framework 2.0 and can be run on all systems above Windows XP.
2. How do I use Path Scanner?
First, download it here. Unpack the zip file and run it. Please make sure that file PathScanner.exe.config is also there.
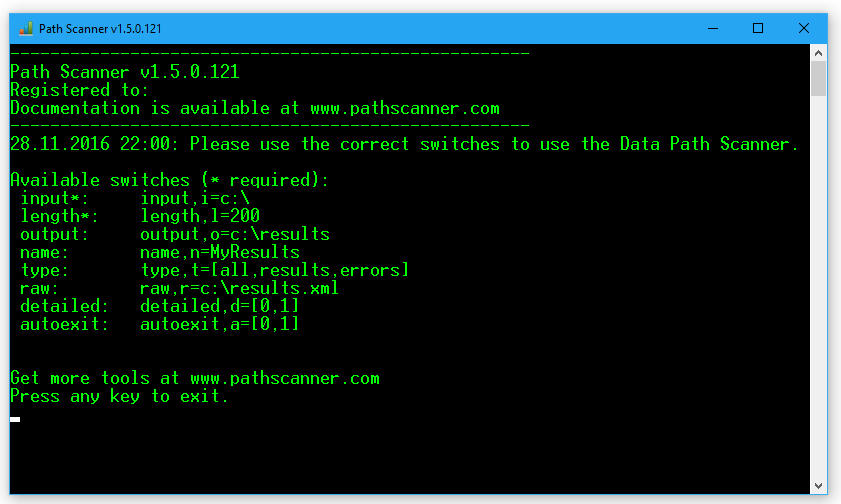
Here is a list of switches. The order is not important.
Please note that with version 1.5.0.121 and above, this features are included:
- you can use shorter cmd argument names (check the "Short" column in the table below),
- the "show" argument was renamed to "type".
| Name | Short | Type | Description | Syntax |
|---|---|---|---|---|
| input | i | required | This is the path you want to scan. All sub-folders are also included. | input=c:\ input="c:\my folder" i=c:\ |
| length | l | required | Length switch will determine the minimum length of the file path you want to search for. If the length is set to 150, then the result files will contain all the files that have 150 or more chars in file path. | length=150 l=150 |
| output | o | optional | Set the output path where the result files will be saved. Result files consist of CSV and XML files. If switch is omitted, results will be stored in the same path as PathScanner.exe. | output=c:\ output="c:\results" o=c:\ |
| name | n | optional | Name switch will determine the name of the CSV and XML files. If the name is not specified the file will be like path_scanner_date_time.csv and path_scanner_date_time.xml. | name=my_file_name n=my_file_name |
| type | t | optional | You can change which files you want to see in the results. Switch values are all, errors, results. If you want to save information about all scanned files in the input folder, than use all parameter. If you want to save information only about the files with errors (permission errors, too long paths,...) use errors parameter. Parameter results is a default switch, which is used even if you don't specify the type switch. It will save information about the files, which are above specified length. | type=all type=errors type=results t=all |
| raw | r | optional | If you've done a scan and want to re-run the search with different length, for example, you can use raw switch to process the files without the hard drive scan. This is recommended if you have used type=all which will contain all the files. | raw=c:\path_scanner.xml r=c:\path_scanner.xml |
| details | d | optional | Set this switch to 1 to save additional info about the files, like File size, date modified, date created, extension, is read only, is archive, is hidden and is system. Omit the switch for old style results. | details=1 d=1 |
| autoexit | a | optional | If you want to close the Path Scanner when it's finished, set this switch to the arguments: autoexit=1. If it's set to other then 1, then it's ignored. | autoexit=1 a=1 |
3. Ready for some examples?
Example 1: This command will scan c:\ and save results, which are longer or equal to 150 characters and the results (CSV and XML file) will be saved to c:\myresults folder.
c:\> PathScanner.exe input=c:\ length=150 output=c:\myresults
Example 2: Another example with one difference; destination folder is in quotes because it contains spaces. If input and output paths contain spaces, you need to use "".
c:\> PathScanner.exe input=c:\ length=150 output="c:\my results"
Example 3: This command will run Path Scanner and append all scanned files, not only the one with length of 150. Alternative param of the switch type can be param results or param errors.
c:\> PathScanner.exe input=c:\ length=150 output=c:\myresults type=all
Example 4: The switch type=errors will output only files which path length was not resolved due to an error (permission, too long paths, ...).
c:\> PathScanner.exe input=c:\ length=150 output=c:\myresults type=errors
Example 5: In addition to all other switches, there is also a name switch, which specifies the name of CSV and XML output file. This will result in MyPrimaryDrive.csv and MyPrimaryDrive.xml files, which will be stored in c:\myresults folder in the example below.
c:\> PathScanner.exe input=c:\ length=150 output=c:\myresults type=errors name=MyPrimaryDrive
Example 6: This command will run Path Scanner using raw switch, which takes XML file instead using file system file scan, and process it.
c:\> PathScanner.exe raw="c:\my raw file.xml" length=150 output=c:\myresults
4. File status description
| Status | Description |
|---|---|
| Fine | File path length is between set length switch and 230 characters. |
| Problematic file path | File path length is between 230 and 259 characters, which is almost at the limit. We advise to shorten the file path. |
| File path too long | File path length is more than 259 characters. |
| OK | File path length is under your specified length switch. Those files are only save to CSV and XML when type=all is used. |
| Permission error | You don’t have permission to scan that file. |
| Unknown error | Unknown error, which might be due to locks. |
Note: If Path Scanner can not open a folder for any reason, it's content scan is skipped and information is not written to results. We could improve this in the future, by adding an additional log.
5. Output description
- CSV file contains 3 columns, File, Path length and Status. Columns are separated by tab, since file names can contain commas. Below is an excerpt of the CSV file.
  File	Path length	Status
  C:\downloads\temp\source\code\index.cs	38	Fine
  C:\downloads\temp\source\code\temp\source\code\temp\source\code\temp\source\code\edit.cs	155	Fine
  ...
As of version 1.5.0.121 Path Scanner also supports detailed output files, like this:
  File	Path length	Status	FileSize	DateModified	DateCreated	Extension	IsReadOnly	IsHidden	IsArchive	IsSystem
  C:\downloads\temp\source\code\index.cs	38	Fine	6804	17.2.2016 9:15	17.11.2016 8:48	.csproj	FALSE	FALSE	TRUE	FALSE
  C:\downloads\temp\source\code\temp\source\code\temp\source\code\temp\source\code\edit.cs	155	Fine	538	17.2.2016 9:15	17.11.2016 8:48	.user	FALSE	FALSE	TRUE	FALSE
  ...
- XML file is suitable for Microsoft Excel 2007 and above and other programs. You can also reuse XML file for a process without drive scan, using raw switch (check above). Below is an excerpt of the XML file.
  <ArrayOfScanResults>
    <ScanResults>
      <FilePath>g:\Repositories\CMS\locks\db.lock</FilePath>
      <PathLength>33</PathLength>
      <Status>OK</Status>
    </ScanResults>
    ...
  </ArrayOfScanResults>
As of version 1.5.0.121 Path Scanner also supports detailed output files, like this:
  <ArrayOfScanResults>
    <ScanResults>
      <FilePath>g:\Repositories\CMS\locks\db.zip</FilePath>
      <PathLength>33</PathLength>
      <Status>OK</Status>
      <FileSize>34575735</FileSize>
      <DateModified>26.10.2008 17:29:04</DateModified>
      <DateCreated>17.11.2016 10:12:43</DateCreated>
      <Extension>.zip</Extension>
      <IsReadOnly>False</IsReadOnly>
      <IsHidden>False</IsHidden>
      <IsArchive>True</IsArchive>
      <IsSystem>False</IsSystem>
    </ScanResults>
    ...
  </ArrayOfScanResults>
Please note that Path Scanner overwrites any results file if exist in the output folder.
6. Set custom CSV delimiter
You can set custom delimiter character inside PathScanner.exe.config. The value is in decimal format and is by default set to 59 which is a semicolon (;). We do not advise you change it, but depending on your setup you might need to do that. You can also check this reference to get the correct decimal value for the delimiter of your choice.
  <PathScanner.Properties.Settings>
      <setting name="DelimiterDecimalValue" serializeAs="String">
		<value>59</value>
      </setting>
  </PathScanner.Properties.Settings>
7. Set date and time format for result files
You can set custom date and time format for results (CSV,XML) file names inside PathScanner.exe.config. The default value for date is yyyy-MM-dd (yyyy=year in 4 digit format, MM=month, dd=day in 2 digit format) which is for example 2017-06-22. The default value for time is HH-mm-ss (HH=hour in 24h format, mm=minutes, ss=seconds) which is for example 09-22-12. If you want to change it, please note the low case and up case letters, for example yyyy-MM-dd is not the same as yyyy-mm-dd or HH-mm-ss is not the same as HH-mm-SS.
  <PathScanner.Properties.Settings>
      <setting name="DateFormat" serializeAs="String">
        <value>yyyy-MM-dd</value>
      </setting>
      <setting name="TimeFormat" serializeAs="String">
        <value>HH-mm-ss</value>
      </setting>
  </PathScanner.Properties.Settings>
8. Add Path Scanner to system enviroment variable PATH
Path Scanner can add itself to the system environment variable PATH by setting the parameter SetEnvironmentPathOnStart inside PathScanner.exe.config. The value is boolean, default is TRUE. When the Path Scanner runs it adds itself to it. If you set the SetEnvironmentPathOnStart to false then it will remove itself from the variable. Restart of computer is needed for PATH variable to reflect the change. After all is set, you can use Path Scanner from any location in your CMD.
  <PathScanner.Properties.Settings>
      <setting name="SetEnvironmentPathOnStart" serializeAs="String">
		<value>True</value>
      </setting>
  </PathScanner.Properties.Settings>
9. Run Path Scanner with Task Scheduler
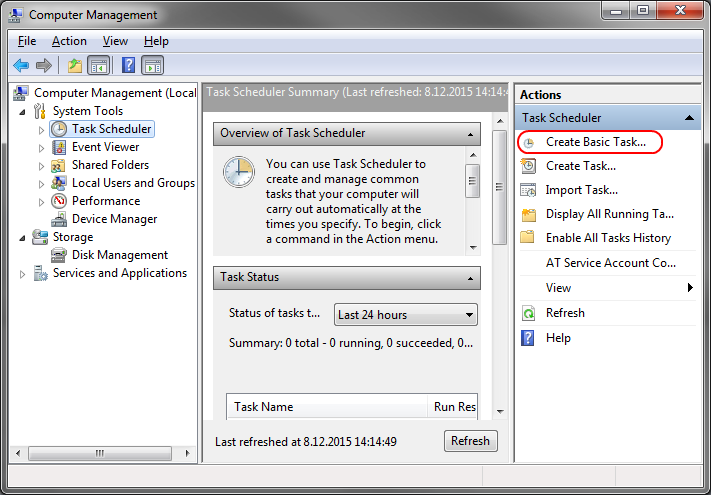
- Open the Computer Management console. You can click Start button and type compmgmt.msc to run/search field and hit enter.
- Select Task Scheduler on left and click on Create Basic Task button on the right.
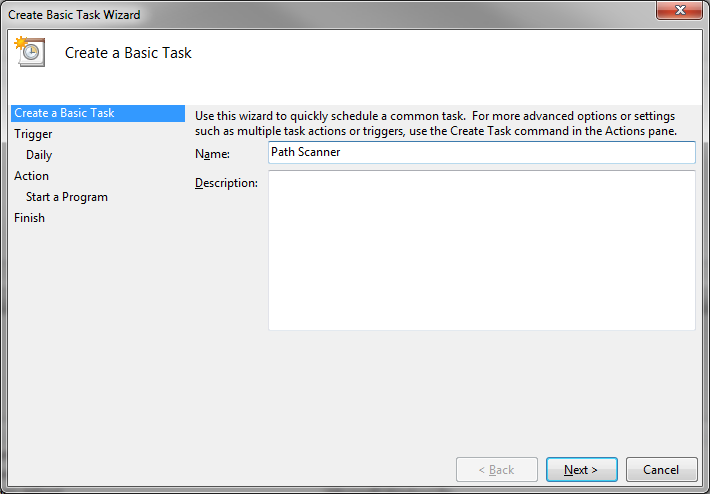
- The wizard opens up.
- Set the name and description (optional).
- Click Next.
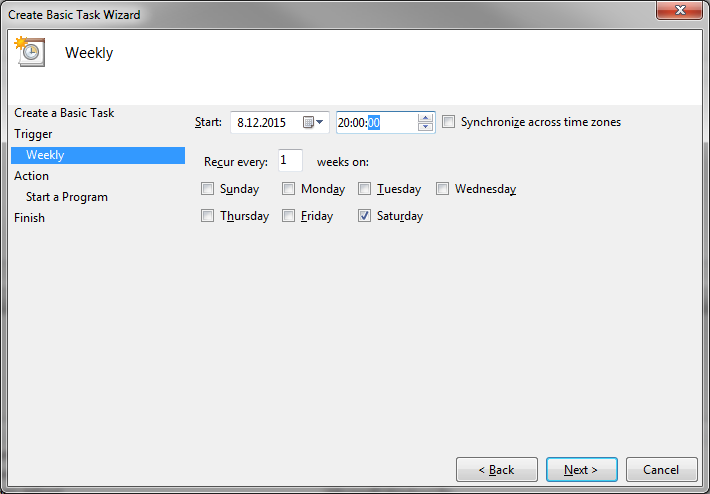
- Set the trigger. In this demo we use Weekly trigger.
- Set when to run the task in the pane.
- Click Next.
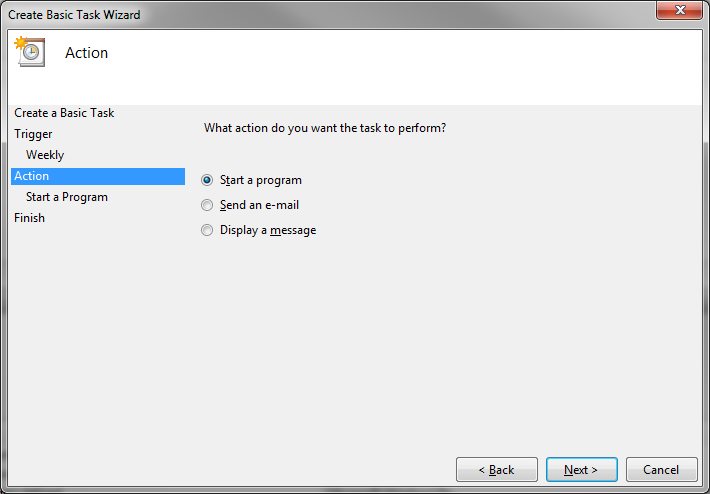
- Set the action to Start a program.
- Click Next.
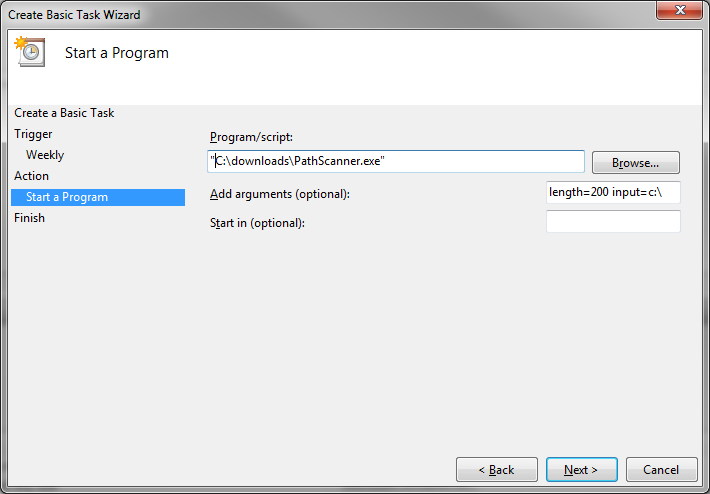
- Click Browse and navigate to the PathScanner.exe. Put "" around the path.
- Add Path Scanner switches to field Add arguments (optional). Check the instructions above for more info.
- Click Next.
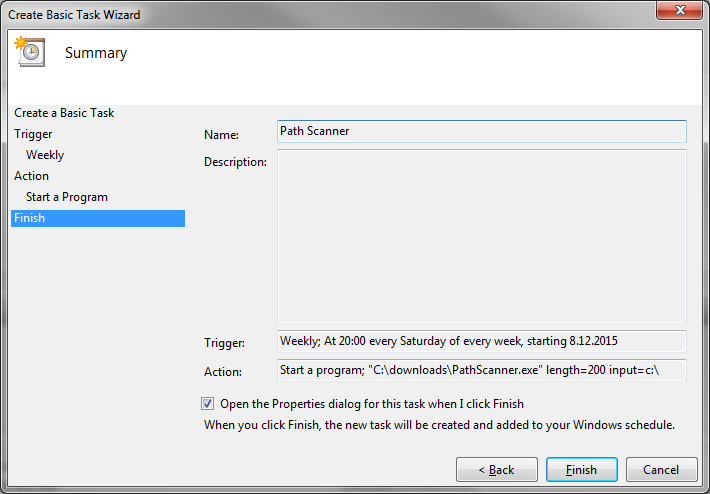
- Review task parameters and click Finish.